4.1 Preparation
1) All purchased valves must first be inspected for product acceptance, and the quality certification documents should be verified for completeness, appearance, and product performance. Only qualified valves should be tested.
2) Before the valve’s air tightness test, the specifications and model of the valve to be tested should be confirmed. Check whether the valve components are complete, and the inner valve body is clean. Especially for the valve seat, ensure that there are no particles or impurities. Perform a visual inspection of the valve and its transmission to ensure they are in good condition.
3) The valve’s pressure leakage test should be determined according to specifications and pressure test procedure requirements, including valve types, test pressure, test procedure, test time, medium, certificates, pressure relief, and other requirements.
4) Ensure that the inspection of the safety valve and the instruments involved in the test has been completed. Ensure there are no remaining issues that affect the test and that the certificate is within the valid period.
5) Expose the valve and all temporary connection points for inspection.
All pressure test data and requirements must conform to the drawings.
6) Test equipment includes nitrogen bottles, safety valves, pressure gauges, pressure test flanges, gaskets, bolts, hoses, plastic bottles, and recorders.
4.2 Operation processes
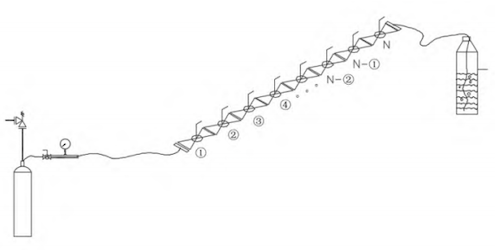
1) First, connect valves that have the same specifications and models. Then, connect one port of the connected valve to the pressure test soft pipe, pressure gauge, air source control valve, air source, and safety valve. Lead the other port through a hose to a container filled with clean water, as shown in Figure 1.

Figure 1 The schematic diagram of valve airtight connection
2) Close the first valve at one end of the valve group, and open all valves behind it. Pressurize the valve to the test pressure and maintain it. Observe whether there are leakages at all sealing parts of the valve. Simultaneously, observe whether there are bubbles in the container filled with clean water. If no bubbles are generated, the tested valve has no internal leakage. Otherwise, it indicates that the closed valve leaks.
3) Test the connected valves sequentially. During the test, close the valve being tested, and open the valves in front and behind it until the pressure test is completed.
4.3 Inspection standards of valve’s air tightness
1) To test whether the valve is leaking, use a spray bottle filled with soap solution to spray on the closed valve housing and the sealing joints.
If no bubbles are generated, the valve is qualified. Otherwise, it indicates there is a leak in the valve housing or joints.
2) To test for internal leakage in the valve's internal seal, use a hose to lead the end of the valve connection group to a container filled with clean water. If no bubbles are produced, the valve is qualified. Otherwise, it indicates internal leakage.
3) This sealing test requires that there be no visible leakage.
4.4 Precautions
1) For two-way sealed valves, both ends must be tested. During the test, pressurize one end of the valve and leave the other end open to observe for leakage.
2) For one-way sealed valves, apply pressure at the inlet end of the valve (except for check valves). For check valves, apply pressure at the outlet end of the valve.
3) Check all tools and instruments used for the test. Ensure the pressure gauge is calibrated within the last 12 months. The accuracy should be at least level 1.6. The pressure gauge range should be 1.5 to 2.5 times the test pressure, and there should be at least two pressure gauges.
4) During the test, gradually increase the pressure to the test pressure according to the test procedure.
5) The test calibration pressure of the safety valve should not exceed 1.1 times the test pressure.
6) During the valve air tightness test, control the ambient temperature to be at least 10°C above the ductile-brittle transition temperature of the metal.
4.5 Post-processing of valve’s air tightness test
1) After the valve passes the air tightness test, it must be fully dried, rust-proofed, and its sealing surface protected. After the valve passes the air tightness test, fully dry it, apply rust protection, and protect its sealing surface.
2) After passing the test, tag the valves to distinguish them from non-pressure tested valves.
3) After passing the test, issue a test report for the valve and keep follow-up records.

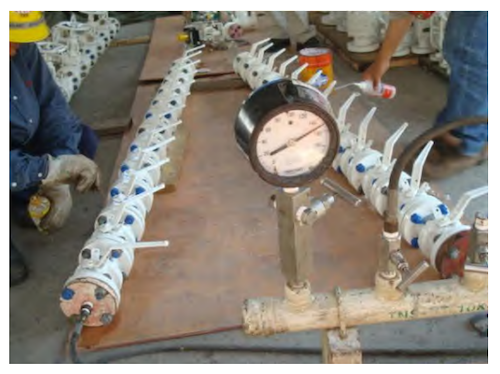
Figure 2 Photos of valve airtight construction
5. Conclusion
The valves completed relevant inspections and tests in accordance with the contract and standard requirements before leaving the factory. The valve tightness test upon site arrival is an important quality control method before the valve is installed in this project. It also brings certain risks and pressures to the project plan and cost. It is recommended to identify and check relevant technical requirements before signing the project contract, ensure the quality of the valves, meet the construction progress requirements and reduce the construction cost. The valve airtight solution adopted in this project is a simple and efficient method, serving as a reference case for related projects.