Valves are critical components in offshore oil platform process pipeline systems. They play crucial roles in cutting off flow, regulating pressure, throttling, changing media flow direction, and performing other essential functions. Common
valves used in these pipeline systems include gate valves, globe valves, ball valves, check valves, and butterfly valves. If valve quality or performance does not meet specified standards, it can directly impact offshore pipeline operation and may lead to serious accidents. Valve pressure testing includes shell strength tests, sealing tests, and other evaluations. For valves with two-way sealing, a two-way sealing test is required; for valves with upper sealing, an upper sealing test is required. Successfully passing the valve leakage test is essential for the valve to be placed into normal operation within the system. This article describes the process, standards, and precautions for conducting valve leakage tests.

Each valve is typically tested for leakage before leaving the factory, with qualification assessed according to maximum leakage standards, and an inspection report is issued. Additionally, performing a leakage test before installation is necessary to ensure the valve’s suitability for normal operation within the system. This necessity arises for two main reasons. First, users are generally unable to witness the leakage test firsthand. Second, uncertain factors during transport and storage—such as collisions or drops—could affect the valve’s integrity. Thus, performing a leakage test before installation is essential.
The sampling ratio for the valve sealing test should be determined based on technical requirements, such as enterprise standards, specifications, or contracts. For example, using the commonly applied ratio for offshore oil platforms, 5% of valves or at least two valves per brand, material grade, type, size, and pressure rating—whichever is greater—are sampled. If a valve fails the test, it must be repaired and retested as required, and the sampling quantity is doubled.
Before the test, the valve’s quality certification documents should be checked, and the valve body, bonnet, gland, flange surface, and closing components should be visually inspected. If scratches or defects are found on the flange surface, it must be repaired and inspected before proceeding with the sealing test.
The valve sealing test should be performed on a dedicated test bench, which includes pumps, compressors, manifolds, blind plates, recorders, pressure gauges, safety valves, hoses, etc. All equipment must have a pressure-bearing capacity that meets the test pressure, and the pressure gauge range should be 1.5 to 2 times the test pressure. If these requirements are not met, the test should not proceed. For austenitic stainless steel valves, the chloride content in the test water must be 50 ppm or less.

Before filling with the test medium, the valve should be inspected. Ensure that the valve is free from particles or impurities on the valve seat. Check that the filter and hose of the pressure test pump meet standards, and verify that the valve data sheet, label number, serial number, pressure, and other information are correct. Seal and tighten all end faces, using the appropriate seals to ensure that the test valve can maintain stable pressure. Fill the test medium from the system’s lowest point. While filling, keep the vent open to fully exhaust any air in the valve body. Begin pressurization only after completing the above preparations.
When the valve to be pressure-tested is a two-way sealed valve (excluding double block-release or globe valves), apply pressure alternately at each end of the closed valve while connecting the other end to the atmosphere, and check for leakage at the open end. For globe valves, apply pressure from the bottom to the valve disc. For one-way valves, select the pressure application direction based on the valve type; apply pressure at the inlet end for globe valves and at the outlet end for check valves. For butterfly valves with an elastic liner or seal and a CL125 or CL150 flange, perform leakage testing in only one direction. For other types of elastic-sealing butterfly valves, perform leakage testing in both directions. For valves with a preferred flow direction, reduce the test pressure for the non-preferred direction according to relevant standards or procedure documents. For wedge-test single-disc gate valves (either elastic or rigid), do not use water or soapy water on the seal during low-pressure tests to check for leaks in the body cavity between the seals.

When pressurizing, maintain steady pressure and gradually increase it until reaching the test pressure. Once the pressure reaches the test pressure and the test medium in the system stabilizes, the test time can be calculated, or leakage can be recorded. The minimum pressure-holding time for the valve leakage test should follow the relevant technical documents. As an example, the minimum time for the valve sealing test should follow ISO 5208 standards, as shown in Table 2 below.
Table 2 Minimum Test Duration
| Valve Size |
Minimum Test Duration (seconds) |
Shell
All Valves |
Optional backseat when relevant |
Isolation Valves |
Check Valves |
| DN < 50 |
15 |
15 |
60 |
60 |
| 65 < DN ≤ 150 |
60 |
60 |
60 |
60 |
| 200 < DN < 300 |
120 |
60 |
120 |
120 |
| DN ≥ 350 |
300 |
60 |
120 |
120 |
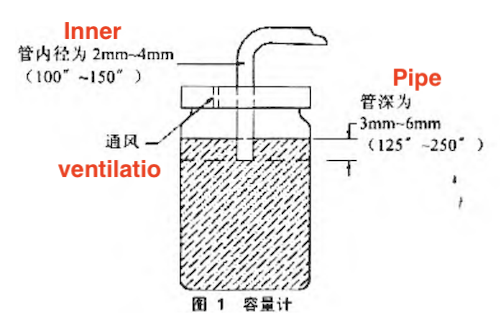
When the test medium is liquid, the volume of the leaked liquid should be measured using a standard measuring cylinder after collecting it within the specified time and then compared with the test requirements. When the test medium is gas, a tube with an inner diameter of 2 to 4 mm should be inserted into water to a depth of 3 to 6 mm to measure the volume of the leaked gas. The axis of the tube should be perpendicular to the horizontal plane, and its end should be smooth and flat. The device illustrated in the figure below can be used to collect the leaked gas. The specific leakage detection standard for the valve sealing test may be an industrial standard (common examples include, but are not limited to, ISO 5208 and API 598) or a standard recommended by the manufacturer. Here, API 598 is used as an example to indicate the maximum leakage allowed for the valve sealing test.

Figure 1 Volume meter
After completing the valve sealing test, the drain plug should be opened to discharge the test fluid from the valve cavity and dry it. If it is a water pressure test, after draining the residual water from the valve, it is necessary to blow air through it to remove any remaining moisture. After completing the valve sealing test, a plastic end cap or blind plate should be used to protect the valve's end. The valve that has passed the sealing test should be completely covered and stored in the designated location as required.
If the valve sealing test result does not meet the required standard, it is considered unqualified. For valves that fail the test, they should be repaired as necessary, and the valve sealing test should be repeated. If the valve sealing test is a random inspection, the number of inspections should be doubled, and the valve sealing test should be conducted again.
The valve sealing test involves high pressure and inherent risk factors. If the pressure in the system is too high, it may damage the equipment or pose a safety threat to the participants in the pressure test. Therefore, a safety valve should be installed in the test facility to prevent system over-pressurization. The safety valve must have a valid calibration certificate that is within the validity period. All personnel participating in the pressure test should possess relevant experience. A designated test area should be established, where only participants in the pressure test are allowed; other personnel must remain outside. All participants in the pressure test must wear complete personal protective equipment (PPE). Obstacles, isolation belts, warning signs, and other barriers should be used to isolate the test area from adjacent areas. HSE inspectors should oversee and supervise the entire pressure test process to ensure it is conducted safely. Unauthorized personnel are prohibited from remaining near the isolation area.
The valve sealing test is a crucial step in the construction process of offshore platforms in oil engineering, directly affecting subsequent processes and final acceptance results. Therefore, testing and inspection personnel should strictly adhere to the applicable technical documents to conduct operations and inspections for valve sealing tests.


